HMW Simulator
Introduction
The HMW Simulator emulates the actors involved in the Hospital Medication Workflow (HMW) integration profile. The simulator can be used to simulate the missing partner when testing that profiles :
| Integration Profile | Actor | Options |
|---|---|---|
| HMW | Prescription Placer | Advanced Prescription Notification |
| HMW | Pharmaceutical Adviser | Validated Order Confirmation |
| HMW | Medication Dispenser | Advanced Prescription Notification |
| HMW | Administration Informer | Advanced Prescription Notification Validated Order Confirmation |
The HMW simulator can help testing applications implementing all the actors participating to the profile.
How to get started
Get a Gazelle account
First of all, note that, like the other applications from Gazelle testing platform, the HMW Simulator is linked to our CAS service. That means that, if you have an account created in Gazelle, you can use it, if you do not have one, you can create one now by filling the form here. Create an account in Gazelle is free. The login link (“cas login”) is located in the top right corner of the page.
Be careful, you must be logged in order to use the HMW Simulator.
Registration of Systems Under Test (SUT) acting as HL7 responders
If your system acts as an HL7 responder in one of the transactions offered by the simulator (for example your system is an Pharmaceutical Adviser and supports PHARM-H1 transaction), you will have to enter its configuration in the application. (No need to enter one configuration per transaction for your SUT. For example, the Pharmaceutical Adviser acts as a responder for the transaction PHARM-H1 and PHARM-H3. Just need to enter one configuration for your Pharmaceutical Adviser SUT.)
In order to proceed, go to “System Configurations” and hit the “Create a Configuration” button. You can also copy  or Edit
  an existing configuration (one of yours !).
In both cases, the simulator needs to know:
- A name for your configuration (displayed in the drop-down list menus)
- The actor played by your system under test
- The receiving facility/application
- The IP address
- The port the system is listening on
- The charset expected by your SUT
If you are logged in when creating the configuration, you will be set as the owner of the configuration. If you do not want other testers to send messages to your SUT you can uncheck the box “Do you want this configuration to be public?” and you will be the only one to be able to select your system in the drop-down list and to edit it (if logged in!).
Before sending messages to your system under test, ensure that your firewall options give to HMW Simulator the access to your system.
What is the Workflow Setup in the HMW Simulator and how to manage it
More than a big simulator for all actors acting in the HMW Supplement, the HMW Simulator simulates a typical workflow concerning the prescription, dispensing, distribution and administration of medication.
What does it means for the user ?
After to have enter your SUT configuration, you must create your own workflow setup. Each workflow setup will be linked to your gazelle account. So, you will be the only one to allow to modify your workflow setup. To create a new workflow setup, go to the workflow setup menu, enter the name of your workflow setup and configure each actors singly, below the sequence diagram.
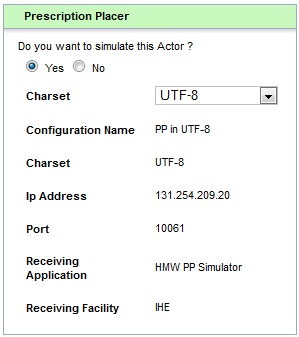
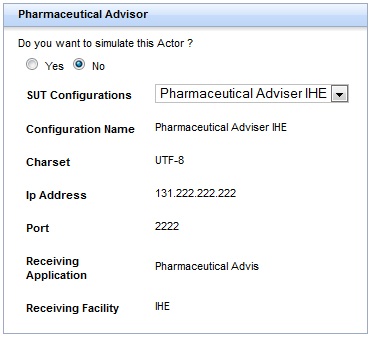
For each actors, you can decide to simulate this actor and choose the charset that you desire to use, OR select your SUT configuration in order to test your SUT. For example, if you want to test your Medication Dispenser actor, you will simulate the Prescription Placer, Pharmaceutical Adviser and the Administration Informer actors. Of course, you can have more than one SUT actor per workflow setup (with a maximum of three SUT).
About the color of the actor panel configuration header, the green means that the actor will be simulated, and the blue means the actor will be not simulated.
Don’t forget to save your configuration in using the button below :

Soon as your workflow setup is ready, you can go to the next part and begin to use the HMW Simulator.
(If you need to work with a charset which doesn’t appear in the charset drop-down list when you simulate an actor, don’t hesitate to talk us.)
Visualize/Edit an existing Workflow Setup
You have the possibility to visualize or edit an existing Workflow Setup which has been created. For that, select, in the top of the page, the option “Visualize/Edit an existing Workflow Setup”. Then, choose, among the available list, the workflow configuration that you desire. You can edit as you want the different actors configuration. Don’t forget to save it.
General Presentation
HMW Actors
In the menu of the HMW Simulator, you can find the “simulators” label, which contains the access to the fourth actors define in the HMW TF supplement.
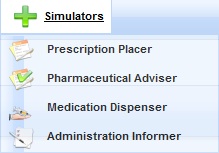
When you hit one of this actor, you will arrive in the front page of the selected actor. The only action that you can do at this moment, it is to choose a Workflow configuration to work with it. A sequence diagram resumes the transaction(s) where the selected actor acts as an initiator.
At this point, there are two possibilities :
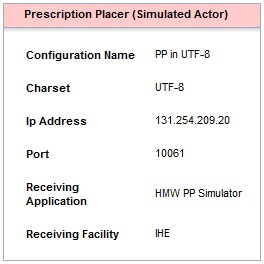
- In the selected workflow setup, the selected actor is not simulated, it is your SUT. So you will see only the resume of the workflow setup configuration just below the sequence diagram.
- In the selected workflow setup, the selected actor is simulated. So you will have different pannels below the configuration resume. The first is here to show you all action that you can do with the selected actor. The second shows all HL7 messages that the selected actor has send and received from the other actors. (see “[HL7 messages validation]”).
(The color of the panel configuration header of the selected actor is salmon pink.)
Prescription Item Color highlighting
In using the HMW Simulator, you should see that the prescription items can be highlighted with different colors. Theses colors are the reflection of the prescription item status.

A prescription item can take 5 different statuses :
- White color : The prescription item just has been created and is waiting for validation.
- Green color : The prescription item has been validated by the Pharmaceutical Adviser actor.
- Blue color : The medication linked to the prescription item has been dispensed, and the Medication Preparation Report has been sent by the Medication Dispenser actor.
- Purple color : The medication linked to the prescription item has been administered, and the Administration Report has been sent by the Aministration Informer actor.
- Red color : The prescription item has been canceled, either by a discontinuation order, or by a replacement order.
HMW Simulator : Send a new prescription
How to create and send a new Prescription Order
If you decide to simulate the Prescription Placer actor, you will be able to access, to the Prescription Placer front page, see the tab below, which group all available action for the Prescription Placer actor.
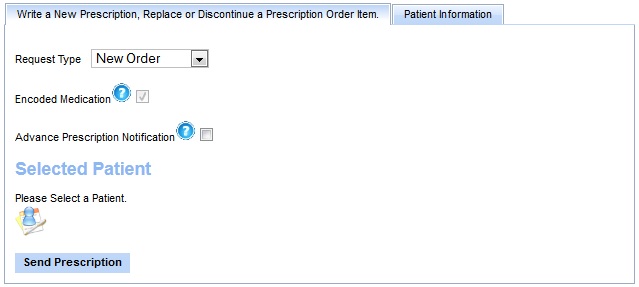
In this section, we will see how to create and send a new Prescription Order to the other actors. First, choose, in the “Request Type” list : “New Order”.
You can see that the level of prescription encoding is : “Encoded Medication” by default and can’t be changed at this moment (see the HMW TF Supplement part 5.6.4.1.2). It will be possible in further version of this simulator.
At last, the “Advance Prescription Notification” option can be ticked or not. Please see the HMW TF Supplement, part 4.2 for more details about this option.
Now that you have chosen your request type, you must select a Patient to begin the creation of a new prescription. To do that, you will have to hit this button  . You will enter to the Patient Information tab panel below :
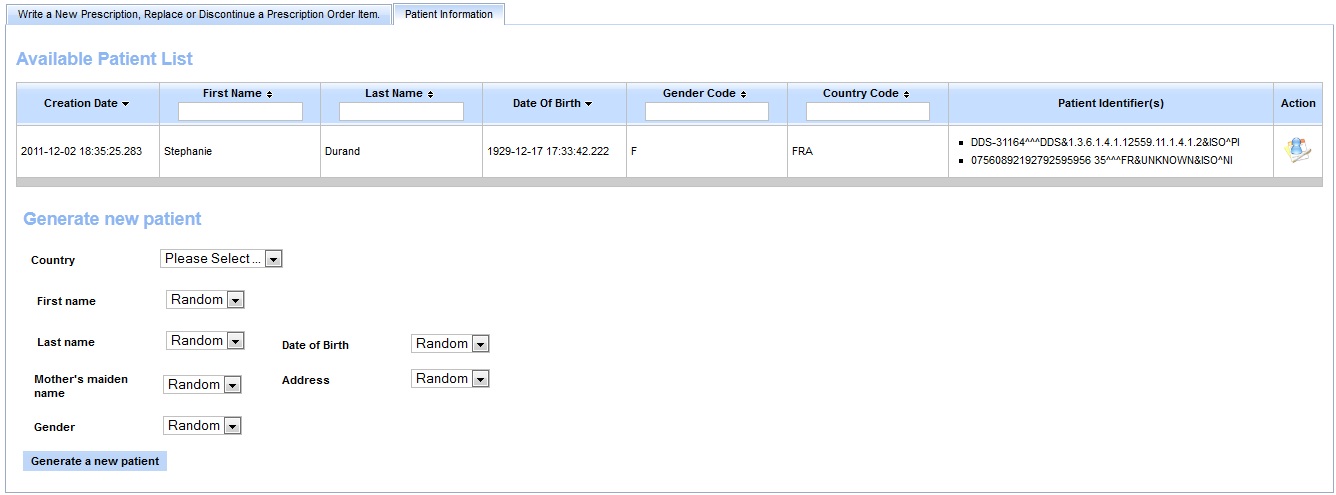
You can either generate a new patient information or select an existing patient with the button  in the Action column. Some filters are available in the header of the Patient data table, to make the patient search easier.
The basic information about your selected patient will be display just below the Available Patient data table.
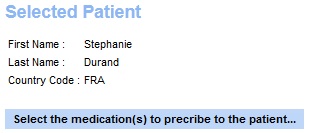
Once your patient has been selected, you must select the medication(s) that you desire put in your prescription. Hit the “Select the medication(s) to prescribe to the patient…” button to go to the Medication Information tab panel. Use the action button  to add a medication to your prescription and the button
  to delete it. The medication list of your selected medication(s) appear below the medication table. Use the button
  next to the “Selected Medication” title to empty the entire list.
As for the Patient data table, the Medication data table allows you to use the filter, locate in the data table header, to search a specific medication.
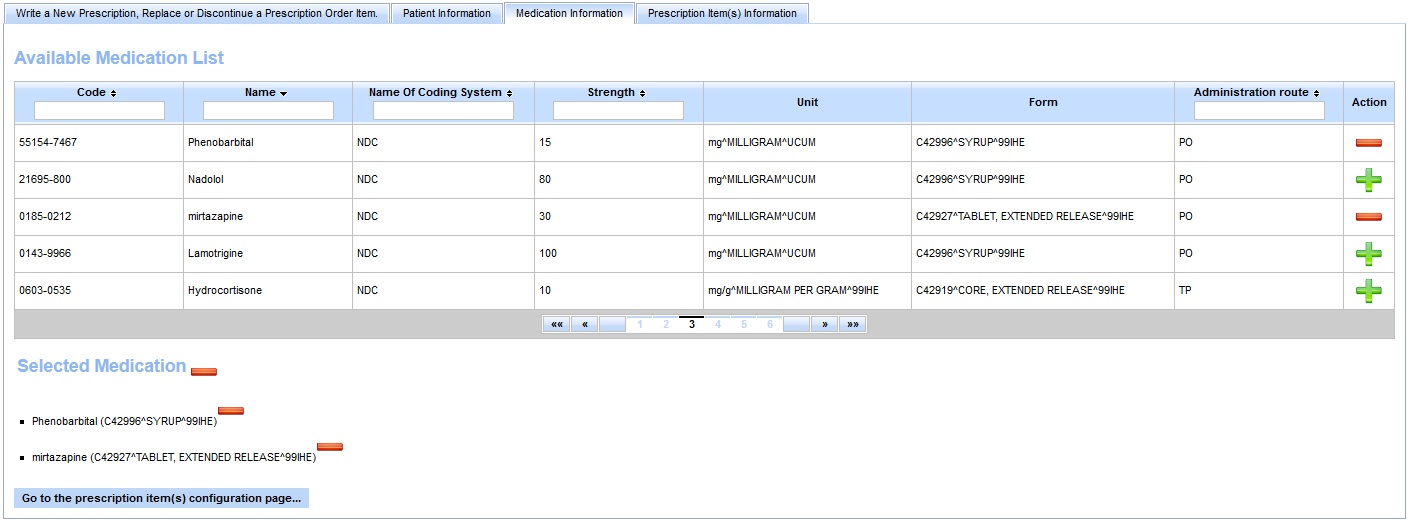
To go to the next step, hit the “Go to the prescription item(s) configuration page…” button.
In this tab panel, you will be able to configure some information linked to each prescription item (if you don’t remember what is a prescription item, go to the end of this part). You can come back to the previous tab panel when you want, to add or remove a medication or select an other patient for example.
When your have finish the creation of your prescription, hit the “Send Prescription” button to send the New Prescription Order to the other(s) actor(s). In order to see the HL7 messages sent, go to see the last panel named : “Messages send and received by the Prescription Placer Actor.”, at the end of the page.

Don’t forget (cf HMW TF Supplement part):
One Prescription Order will be related to one patient, and may refer to a particular encounter (visit). It will contain one prescription, and this prescription refers one prescriber, and contains zero or more prescription items. A prescription item contains one medication item and zero or more observations
Discontinue a prescription
How to send a discontinue order for a prescription item
For the moment, only the Prescription Placer simulator allows to send a discontinuation order. This will be available for the Pharmaceutical Adviser simulator too in a future version of the HMW Simulator.
With the prescription placer simulator
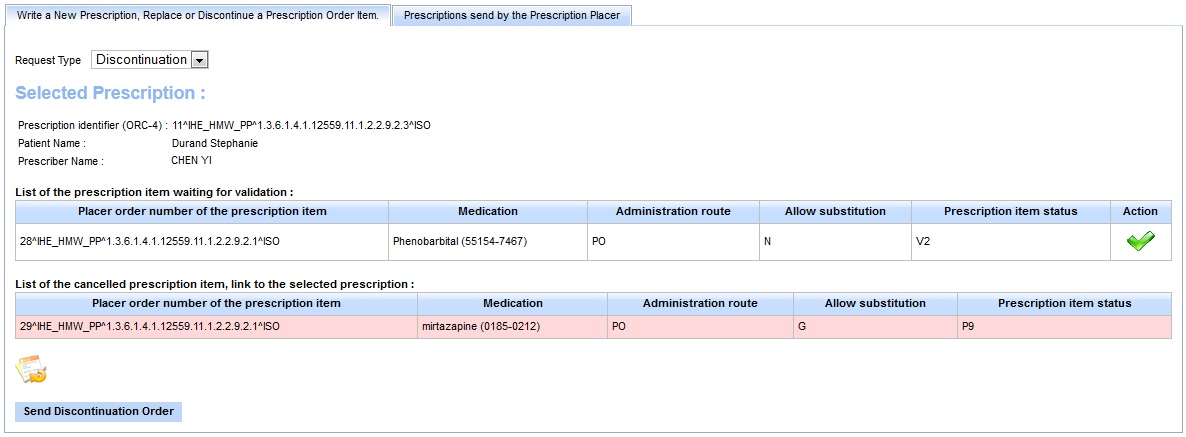
Always in the Prescription Placer actor page, if you desire discontinue a Prescription Order, select, in the “Request Type” List, the value : “Discontinuation”. Then, hit the button  to select the prescription where the prescription item to discontinue is located.

Some explanations about the Prescription Table :
You will see the Prescription Table Over. This Table shows all Prescription Order sent by the Prescription Placer simulator. Each lines of this table represents one Prescription. The medication list, is linked to the prescription item list. Thereby, in this example, for the first prescription (with the identifier “11^IHE_HMW_PP…”), the mirtazapine medication corresponds to the precription item with the placer order number : “29^IHE_HMW_PP…”.
You can see, that for the second prescription, some prescription item are highlighted with a specific color. See the “[Prescription Item Color highlighting]” part of this tutorial for more information.
About the Prescription Status, see the HMW TF Supplement part 4.5.1.

Now, you can select the prescription item to discontinue. Be careful, you can discontinue only one item at a time. Hit the 
 buttons to change the status of the pescription item.
 the item won’t be changed.
 the item will be discontinued.
When your choice is made, hit the “Send Discontinuation Order” to send the discontinuation order to the Pharmaceutical Adviser actor.
(You only can discontinue a prescription item which is not yet validated by the Pharmaceutical Adviser actor. In other words, a prescription item with the status equals to “P3” or “V2”.)
After to have send the discontinuation order, the HMW Simulator modifies the prescription item status to “P9”.
With the pharmaceutical adviser actor (not yet available)
Replace a prescription
How to send a replacement order for a prescription item
For the moment, only the Prescription Placer simulator allows to send a replacement order. This will be available for the Pharmaceutical Adviser simulator too in a future version of the HMW Simulator.
With the prescription placer simulator
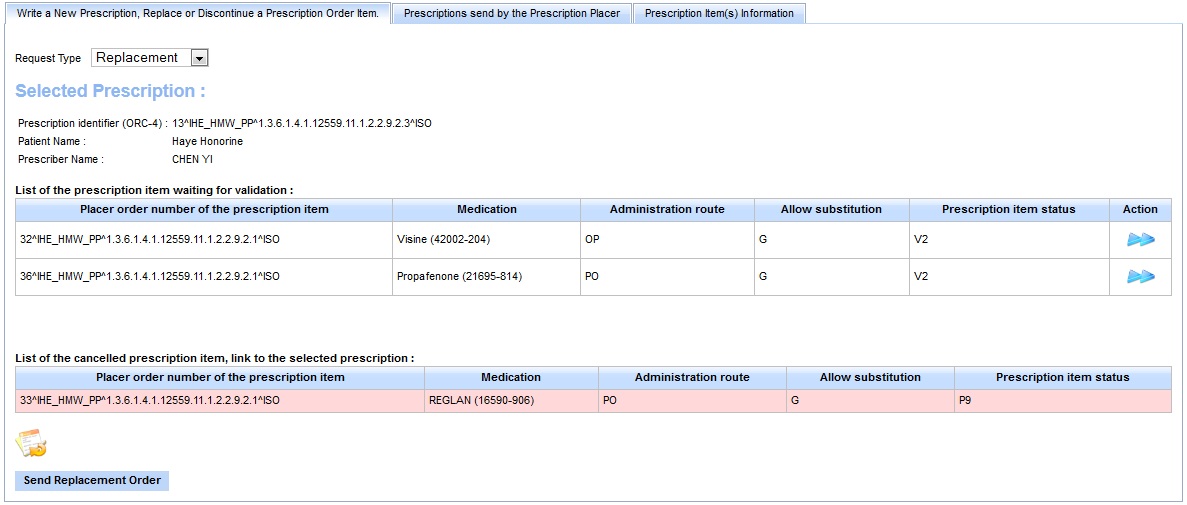
Always in the Prescription Placer actor page, if you desire replace a Prescription Order, select, in the “Request Type” List, the value : “Replacement”. Then, hit the button  to select the prescription where the prescription item to replace is located.

Some explanations about the Prescription Table :
You will see the Prescription Table Over. This Table shows all Prescription Order sent by the Prescription Placer simulator. Each lines of this table represents one Prescription. The medication list, is linked to the prescription item list. Thereby, in this example, for the first prescription (with the identifier “11^IHE_HMW_PP…”), the mirtazapine medication corresponds to the precription item with the placer order number : “29^IHE_HMW_PP…”.
You can see, that for the second prescription, some prescription item are highlighted with a specific color. See the “[Prescription Item Color highlighting]” part of this tutorial for more information.
About the Prescription Status, see the HMW TF Supplement part 4.5.1.
As for the discontinuation order, select one prescription to work on it. Once the prescription selected, you will choose the prescription item to replace. For that, hit the button  , in the Action column.

You will be able to edit some information about the prescription item that you want to replace. The first panel shows you the information of the old prescription item, the item that is to be replace. The second panel shows you the information of the new item. Of course, you can change the medication linked to this prescription item, just need to hit the button  . As soon as you want to send your replacement order, just hit the “Send Replacement Order” button.
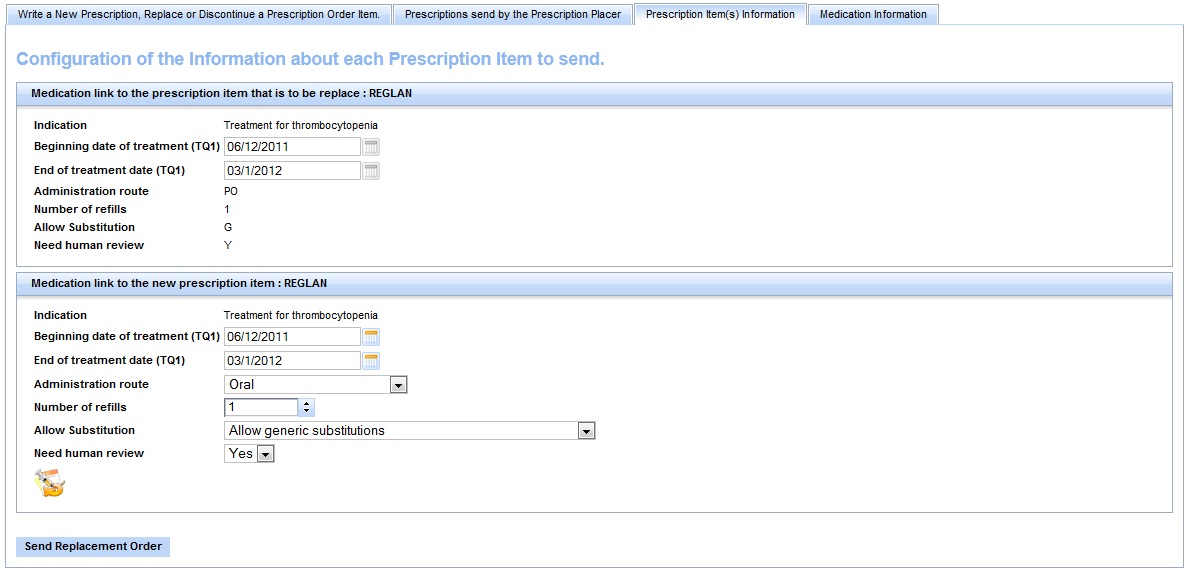
After to have send the replacement order, the HMW Simulator modifies the status of the old prescription item to “P9” (in this example, this is the prescription item with the placer order number “33^IHE_HMW…”). And the new prescription item (in this example, this is the item with the placer order number “36^IHE_HMW…”) takes the place of the old prescription item.
With the pharmaceutical adviser actor (not yet available)
Validate a prescription
How to send a validation order for a prescription item
If you decided to simulate the Pahrmaceutical Adviser actor, you will be able to access, to the Pharmaceutical Adviser page, see the tab below, which group all available action for the Pharmaceutical Adviser actor.
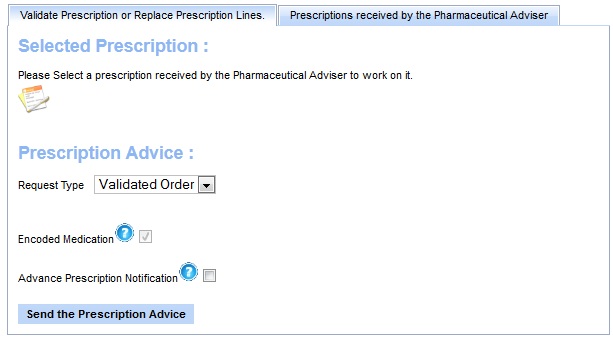
In this section, we will see how to send a Validated Order to the other actors. First, choose, in the “Request Type” list : “Validated Order”.
You can see that the level of prescription encoding is : “Encoded Medication” by default and can’t be changed at this moment (see the HMW TF Supplement part 5.6.4.1.2). It will be possible in further version of this simulator.
At last, the “Validated Order Confirmation” option can be ticked or not. Please see the HMW TF Supplement, part 4.2 for more details about this option.
Now that you have chosen your request type, you must select a Prescription. To do that, hit this button  . You will enter to the Prescription tab panel below. Then, hit the button
  to select the prescription to validate.

Some explanations about the Prescription Table :
You will see the Prescription Table Over. This Table shows all Prescription Order sent by the Prescription Placer simulator. Each lines of this table represents one Prescription. The medication list, is linked to the prescription item list. Thereby, in this example, for the first prescription (with the identifier “1^IHE_HMW_PP…”), the Visine medication corresponds to the precription item with the placer order number : “4^IHE_HMW_PP…”.
You can see, that some prescription item are highlighted with a specific color. See the “[Prescription Item Color highlighting]” part of this tutorial for more information.
About the Prescription Status, see the HMW TF Supplement part 4.5.1.
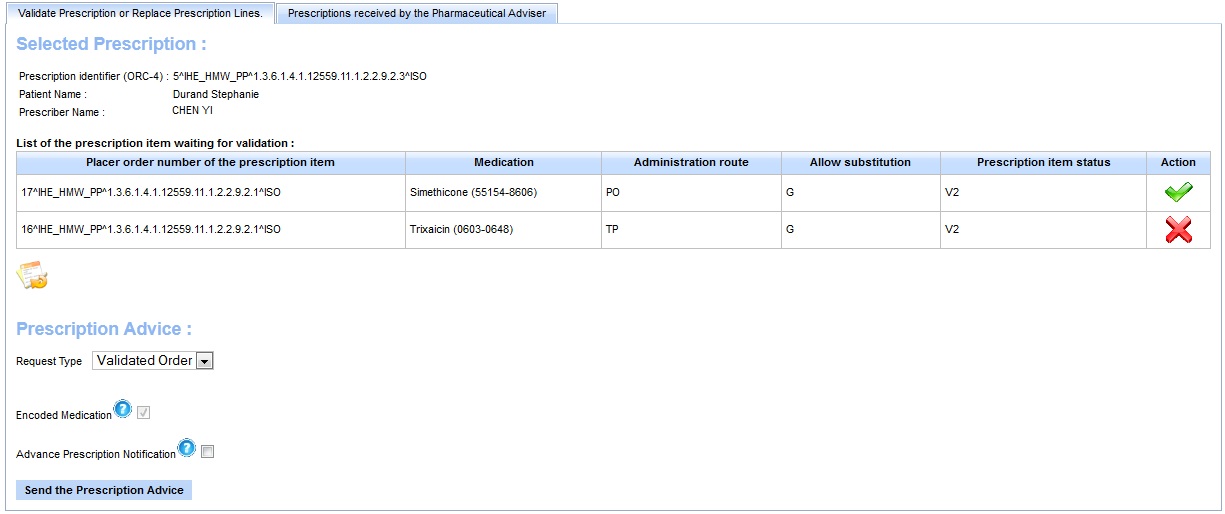
Now, you can select the prescription item to validate. You can validate all item of a prescription at a time, or only some. Hit the 
 buttons to validate or not the pescription item. When your choice is made, hit the “Send the Prescription Advice” button to send the validation order to the other actors.
 the prescription item will be validated.
 the prescription item won’t be validated.
After to have send the validation order, the HMW Simulator modifies the prescription item status to “V3”.
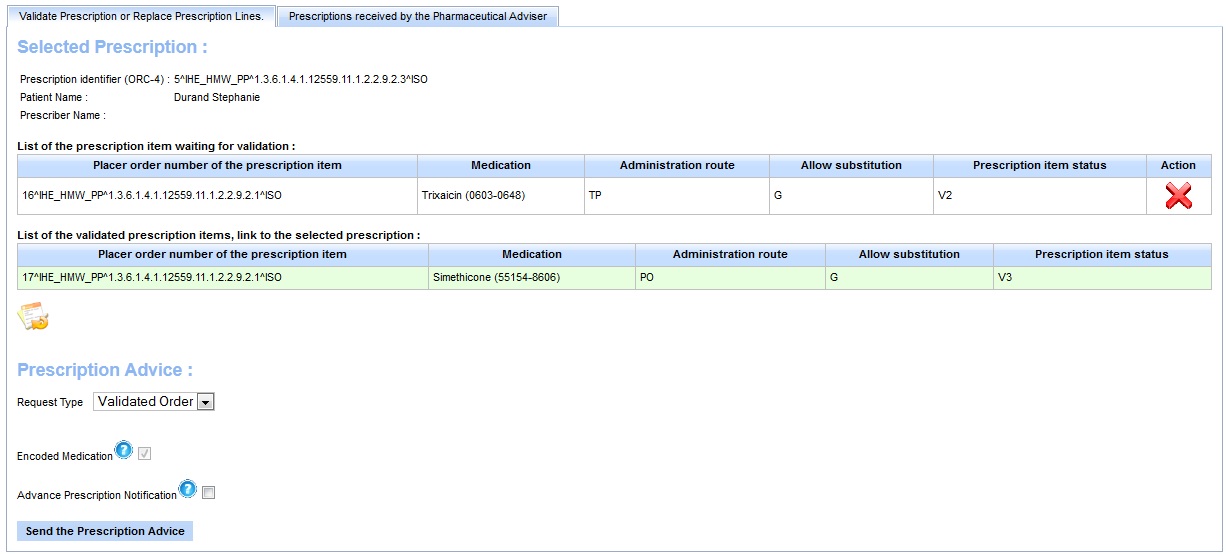
HMW Simulator : Dispense a medication
How to send a medication report
If you decided to simulate the Medication Dispenser actor, you will be able to access, to the Dispenser actor page.

In this section, we will see how to send a Medication Preparation Report Order to the other actors.
Now, you must select a Prescription to work on it. To do that, hit this button  . You will enter to the Prescription tab panel below. Then, hit the button
  to select the prescription to dispense.

Some explanations about the Prescription Table :
You will see the Prescription Table Over. This Table shows all Prescription Order sent by the Prescription Placer simulator. Each lines of this table represents one Prescription. The medication list, is linked to the prescription item list. Thereby, in this example, for the first prescription (with the identifier “3^IHE_HMW_PP…”), the Visine medication corresponds to the precription item with the placer order number : “5^IHE_HMW_PP…”.
You can see, that some prescription item are highlighted with a specific color. See the “[Prescription Item Color highlighting]” part of this tutorial for more information.
About the Prescription Status, see the HMW TF Supplement part 4.5.1.

Now, you can select the prescription item(s) to send the Medication Preparation Report. You can dispense all item of a prescription at a time, or only some. Hit the 
 buttons to dispense or not the pescription item. When your choice is made, hit the “Send theMedication Preparation Report” button to send the medication preparation report order to the other actors.
 the prescription item will be dispensed.
 the prescription item won’t be dispensed.
After to have send the medication preparation report order, the HMW Simulator modifies the prescription item status to “D3”.

HMW Simulator : Administer a medication
How to send a new administration report
If you decided to simulate the Administration Informer actor, you will be able to access, to the Administration Informer page, see the tab below, which group all available action or the Administration Informer.

In this section, we will see how to send a new Administration Report Order to the other actors. First, choose, in the “Request Type” list : “New administration Report”.
Now that you have chosen your request type, you must select a Prescription to begin. To do that, hit this button  . You will enter to the Prescription tab panel below. Then, hit the button
  to select the prescription to validate.

Some explanations about the Prescription Table :
You will see the Prescription Table Over. This Table shows all Prescription Order sent by the Prescription Placer simulator. Each lines of this table represents one Prescription. The medication list, is linked to the prescription item list. Thereby, in this example, for the first prescription (with the identifier “3^IHE_HMW_PP…”), the Visine medication corresponds to the precription item with the placer order number : “5^IHE_HMW_PP…”.
You can see, that for the second prescription, some prescription item are highlighted with a specific color. See the “[Prescription Item Color highlighting]” part of this tutorial for more information.
About the Prescription Status, see the HMW TF Supplement part 4.5.1.

Now, you can select the prescription item to administer. You can administer all item of a prescription at a time, or only some. Hit the 
 buttons to administer or not the pescription item. When your choice is made, hit the “Send Administration Report” button to send the administration report order to the other actors.
 the prescription item will be administered.
 the prescription item won’t be administered.
After to have send the administration report order, the HMW Simulator modifies the prescription item status to “A3”.
